Beeswax Wraps

Cling film. Not to be dramatic, but I’m fairly certain that cling film has become the bane of my existence. Which is quite an achievement given the number of years Neil Buchanan engrained into me that cling film was the bee’s knees of kitchen supplies for art attacks and other (pointless) crafts – because who didn’t need a stained-glass window crafted from PVA glue and various paints, smushed together between layers of that tacky, plastic wonder film. Anyone? Anyone at all?

Having worked in catering through my mid-teens to early twenties, cling film was a kitchen staple that no one thought too much about. Trays of cakes to be left out overnight? – cling film. Sandwiches to be taken over to the office in the next building? – cling film. A homemade brownie to be carried approximately fifty steps down the path? – cling film. Customer giving too much back chat? – cling film. You get the idea. Fast forward about five years, and I physically cringe at the thought of the sheer volume of cling film I absent-mindedly used and then tossed without a second thought. Now for the science bit – cling film is most commonly made from PVC or polyvinyl chloride. This little bundle of chemical fun, whilst undeniably handy, is just that – chemicals. Chemicals which have been proven to seep into the food that cling film is defending from those pesky little dust particles, and inevitably end up being ingested via said food. So, handy? – yes. Slowly poisoning the consumer it seeks to ‘protect’? – also yes.

But what’s the environmental shaped beef with cling film? First things first it’s a single use plastic. We rip, we wrap, we scrunch and then we toss. End of story. Except that’s not the end of the story is it? Out of sight, out of mind comes to mind, but when we’ve destroyed the planet in the name of convenience, that cling film is going to be a bit more than a cheeky slap in the face. The fruity little chemical cocktail crafted to provide cling film’s stretchy and clingy characteristics cannot be separated, which deem cling film too complicated ( I feel ya) to recycle. As such it ends up being incinerated (oh hi toxic fumes), or dumped into landfill. The OG cling film formula does not break down over time. Instead, those poisonous chemicals slowly seep into the ground and down into the groundwater, where they then enter our water supplies. New-fangled ‘biodegradable’ cling film has a slightly different fate (10 points to you if the term greenwashing springs to mind). These biodegradable alternatives do break down.. into teeny tiny microplastics. You know how in Fantasia, Magician Mickey chopped up the psycho wooden broom that was flooding the room he was in, only to find that he’d now created hundreds of thousands of tiny psycho brooms? Boom – microplastics. The problem hasn’t just magically disappeared, it’s just smaller and there are more of them. Similarly to the chemicals within standard cling film, these microplastics seep into the water supplies and are consumed by the sea-life that us humans later go on to consume. Mmm. Tasty.

Microplastics. Sort of.

Thoroughly traumatised? Excellent. Here’s the good news. Some time ago, a jammy little genius came up with the wonder product that is a beeswax wrap (or bee-less wrap if you’re vegan). Just in case you’ve been living under a rock for the past few years, a beeswax wrap is essentially a cotton square, soaked in beeswax and resin with all the tacky, seal-y qualities of cling film and none of those pesky, poisonous plastics. Heat from your hands can be used to shape the beeswax wrap around the open edge of your container of choice, creating a firm seal. Et voila. Beeswax wraps can be used on (probably) anything. I’m not Google, so I’m not going to reel off every single thing that you can wrap in a beeswax wrap, but there’s A LOT. Check it out, change your life, ditch the cling film, save the turtles. 

Nowadays you can buy these beauties just about anywhere – a personal favourite of mine being those created by Soseas. No this isn’t an ad, but I’ve got a lot of love for the company’s roots (see here) plus narwhals are undeniably great – fight me. Beeswax wraps are also notoriously easy to make should you feel the need – you can find recipes all over the internet but the basic principle tends to be; cotton fabric, beeswax, resin and heat. This actually comes in really handy if you’ve got a specific need for a beeswax wrap that doesn’t quite fit the S/M/L square mould that you’ll usually see within retail packs.

Soseas Beeswax Wraps

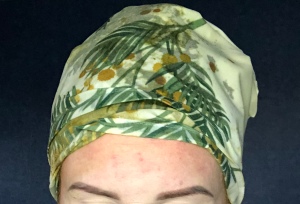
As mentioned in my previous post here, I henna my hair and part of that process involves wrapping my cow pat hair up with cling film during the development process. Believe me when I say that I had hated myself for this, and for the hypocritical act I was committing on a six-weekly basis. Thankfully, I had a lightbulb moment just recently which saw me asking the question; “if I can cling film my head, surely I can just beeswax wrap my head instead?”. With a towel-sized cotton tablecloth, a grater, one pre-made block of beeswax wrap (if you’ve ever tried to melt your own pine resin down, you’ll thank me for this), some greaseproof paper and an iron, you’ve got yourself an art attack (this is all for you Neil B. x)

Be the Beeswax Wrap
Henna’d head 1 – Cling Film 0

Don’t get me wrong, there are some scenarios when there are currently no suitable alternatives available for cling film – in particular within medical application. Cling film can be used for burns and scalds, in first aid to waterproof an injury prior to medical attention, and it’s even saved the lives of babies born within their insides on the outside. On a purely selfish level, and another reason to be overly critical of myself, I’m currently in the process of having laser tattoo removal on my foot. With each new session sees a new layer of cling film taped on to my freshly scorched skin. Somehow, I can’t quite imagine a beeswax wrap cutting it. Fresh tattoos (no, the irony is not lost on me) are also painstakingly wrapped in cling film to add a much-needed layer of protection. I’ve done my research, and I’ve tried to ask the question a number of times, but as of yet I haven’t found an alternative to cling film in these specific instances. If you have any ideas then please do give me a heads up in the comments.

If you’ve learnt anything from this little rant of mine, please let it be that (outside of a few specific circumstances) we do not and cannot need cling film. The environmental impact, let alone risk to your health, will never be outweighed by that tacky little convenience. Ditch the cling film. Befriend some bees. Save the planet.

Much love x

Lush Henna – Caca Rouge

And so it begins. Well throw it back almost five years and then, technically, it begins. Lush Henna will change your life. Full disclosure – in changing your life it’ll be an absolute ball ache – but what’s life without balance?

My name’s Gemma and I briefly made a terrible decision to bleach my naturally mousy hair blond, with box dye, over the course of a couple of years. Think yellow. Think frazzled. Surprisingly not my worst ever life choice, but I can only assume that there will be more on that later. After realising the error of my ways AND following a breakup, I naturally decided to dye my hair chocolate brown. In another of my questionable life choices, I opted for the type of bargain hair salon that sees you paying £9.95 per treatment, and whilst it was a success, I’ll never forget one of the stylists parting comments of “you didn’t put any red into her hair first?! Wow you are really lucky that it hasn’t gone green”. Thanks hun. xo

A few more box dyes down the line, a bit of dabbling with reddy tones – a hair goal long established since seeing, and becoming immediately jealous of, Jean Grey in X-Men circa 2000 – I finally took the plunge and bought my first block of Lush Henna. It was somewhat of a whim as;

  1. I knew of a couple of friends who had tried henna and
  2. I fancied one of the guys in the Lush shop, and discussing the pros of henna hair dye seemed a good excuse as any to spend some more time there. #CreepingItReal

I started off with Caca Marron. I wanted my hair to have some red tones, but I wasn’t brave enough to go full Rouge, having had visions of luminous orange locks. After briefly scouring the internet for a few YouTube tutorials and battling with the task (/witchcraft) of turning a solid block of henna into something vaguely resembling hair dye, I slapped it on my hair and waited patiently. By patiently I mean I stared at the clock for four hours whilst intermittently moaning about the heavy head induced neck ache I was experiencing (sorry mum). Cue the time finally having come to wash this mixture out of my hair. I won’t lie, the first time I took the towel off my head and saw the dark green liquid seeping out of my cling filmed scalp I panicked. What had I done and how quickly could I reverse it. I’m all for the mermaid life, but green hair was not something I could dream of pulling off. I jumped into the shower and tried to wash the henna mix out as quickly as humanely possible – side not, henna does not wash out quickly AT ALL. In hindsight, after having smeared what can only be described as a cowpat-like substance into my hair, I should have prepared myself for a slight battle in trying to wash it all out again. But hindsight is that wonderful thing after all. Once washed and dried, my hair was a bit unruly in the sense that it had more volume that usual – side note, aside from the amazing natural dye, Lush henna is made with cocoa butter which serves as an incredible conditioning treatment. My hair itself – along with my scalp, shoulders and feet (don’t ask) – were sporting a fairly bright orange glow, and if I’m being completely honest I wasn’t immediately sold on the whole look at this point.

As anyone who has researched henna will know, the colour you see immediately after application is not a true reflection of the colour that you’ll actually end up with. Bear in mind that the henna takes a few days to oxidise and reach its true colour, and that you’ll be turning the water orange for a number of hair washes after your initial application. As with anything, you need to trust the process. Whilst I wasn’t completely sold on the colour of my hair immediately after dyeing it, I absolutely adored it a few days later.

Each application saw me getting slightly braver in terms of my colour choice. Whilst I’d started with Marron, I then started to combine half a block of Marron with half a block of Rouge. Then one fateful day when I was desperately due a dye top-up, I flew into Lush only to find – disaster – they only had Rouge blocks in stock. (No you’re being dramatic.) After realising that the world hadn’t ended as the result of my change in henna colour, I haven’t looked back since. #Rouge4Lyf 

Now for a (questionably) useful bit of information – application. According to Lush, this is how to apply your Henna to your hair:

  1. Smooth a protective balm like Ultrabalm around the hairline – or beard line – to ensure your skin is not accidentally tinted.
  2. Break your henna block into chunks and place into a bain-marie or heatproof bowl over a saucepan of hot water. Cover the henna with boiling water and stir until the mixture resembles melted chocolate. The hotter the henna, the better the results.
  3. Wearing some rubber gloves, apply the henna evenly to clean, dry hair. For best results, work from the roots to the tips, starting from the back of the hair and moving towards the front. During the application, ensure the henna stays comfortably hot in a bain-marie or saucepan.
  4. Leave on for up to three hours before rinsing off your henna with shampoo. The colour will continue to develop for up to 24 hours (and up to 48 hours if you’re using Brun or Noir).

According to methis is how to apply Henna to your hair:

  1. Smooth a protective balm like Ultrabalm around the hairline – or beard line – to ensure your skin is not accidentally tinted. It will happen anyway. Your hairline will glow, you ears will glow, you’ll look like you’ve spent the day rolling around in Wotsits. Small price to pay for glossy, ginger locks.
Henna block
  1. a) Break your henna block into chunks and place into a bain-marie or heatproof bowl over a saucepan of hot water. “Break”. Good joke Lush. Unless you’ve been powerlifting elephants, “break your henna block into chunks” isn’t going to happen. Think back to old school Terry’s Chocolate Oranges – except now imagine them to be made of brick. You can chop the henna with a sharp knife, but you’re still in for a workout. Thankfully, your henna block is formed with a handy blend of cocoa butter. I pop my henna block into a glass bowl, and then into the microwave for a minute, at which point the cocoa butter starts to melt and the structure of the henna block collapses. Now you can use a wooden spoon to start breaking the block down further, into a fine crumbly texture – you may need a couple more short bursts in the microwave before you end up with a bowl of muddy crumb.
Post microwaved, crumbled henna
  1. b) Cover the henna with boiling water and stir until the mixture resembles melted chocolate. The hotter the henna, the better the results. It’s worth noting that you don’t want to add too much water – the age-old method of ‘you can always add more but you can’t take it away’. I don’t know the science behind it, but in my experience if the henna mixture is too runny it doesn’t take to the hair particularly well and you may end up with undyed patches).  
Cow pat (*sorry, autocorrect – henna paste)
  1. Wearing some rubber gloves, apply the henna evenly to clean, dry hair. For best results, work from the roots to the tips, starting from the back of the hair and moving towards the front. During the application, ensure the henna stays comfortably hot in a bain-marie or saucepan. used to apply my henna in the kitchen, with my henna mix maintaining a ‘comfortably hot’ temperature over a saucepan of water. It was absolute carnage. Every single time ended in the kitchen resembling having had a herd of cows sh*t everywhere. The henna dries to a mud-like consistency which crumbles every time you breathe, let alone move your arm to apply some more. There was henna in the cutlery drawer, the dog was trying to eat it and my mum was crying – you get the idea. I now take my bowl of henna, and a smaller bowl of boiling hot water for it to sit on, up to the bathroom where I apply it whilst leaning over the bath. Yes, the henna will still crumble as quickly as any stable relationship I’ve ever tried to maintain, but it will be localised and can easily be washed down the drain. I personally don’t have a fool proof way of actually applying the henna. I initially use a small hair dye brush to apply the henna to my hairline and roots, before grabbing a handful of mud and slopping it through the lengths of my hair. You’ll end up with muddy dreadlocks – make sure you split these and check that the inner hair is coated. Henna isn’t a cream dye. You can’t just rub it into your scalp and hair lengths and hope for the best. You will need to be relatively vigilant in ensuring that all of your hair strands are a muddy mess. Once your whole head of hair is coated, I try to twist it into a bun, right on the crown of my head. Two hours into the development time and this will help considerably with the neck ache – believe me.
Muddy dreads
Caca head
  1. a) Leave on for up to three hours before rinsing off your henna with shampoo. The colour will continue to develop for up to 24 hours (and up to 48 hours if you’re using Brun or Noir). It’s worth mentioning that you should wrap your henna’d hair in cling film or something similar* – yes it pains me to recommend that – otherwise you will end up with crumbled henna and dark green henna stains over everything you hold dear (including the dog). I’d also recommend wrapping a towel over the top of your wrapped hair to retain the heat; more heat = richer colour. Pro tip; you may want to wedge some cotton wool balls between the cling film wrap and your scalp around your ears in an attractive manner – this is where you’ll notice the dark green henna liquid starting to seep out during the development process aka. The Sea Monster stage.
  1. b) I personally leave the henna on for at least four hours. Again, I don’t know the science behind it all and whilst it may be that the colour stops developing after three, I’ve always found that I’ve preferred the end result the longer I’ve left the henna to develop. Plus if you’ve already committed to the three-hour slog, what’s another hour between friends?
  1. c) Invest in a sturdy travel cushion (think memory foam) for the henna development process. Yes you will look like a tit, but it’s more than worth it to alleviate some of the neck ache you’d otherwise be facing the next day.
  1. d) Now for the old “rinsing off your henna with shampoo”, or as I’ve touched on previously, utter b*llocks. When washing out the henna, rinse it out with warm water for as long as you can take. The water won’t be running clear anytime soon, but the less grainy your hair feels by the end of it, the better. Next, conditioner – and lots of it. I’ll buy myself a cheap hair conditioner solely for this part of the process. The conditioner seems to latch on to the henna grains and draw them out of your hair. It’s not a complete miracle worker, but it was a huge game changer over a year into henna-ing my hair. Rinse and repeat the conditioning process again, before shampooing, conditioning and being unbelievably grateful for being able to sit up straight again. 
  1. e) Public service announcement: your bath/shower will look like a sea monster has died in it. But again, if you rinse and wipe it down relatively quickly it doesn’t stain. 
CSI: Sea Monster

Don’t get me wrong – I’m very aware that that may sound like an awful lot of effort compared to a box dye – but to anyone who is even slightly contemplating using henna, I completely and utterly recommend it. The end result more than outweighs any hassle in its application. Full disclosure; I’m the Queen of taking the easy option, but the fact of the matter is that I’ve now used henna for going on five years and have no intention of ever changing that.

No filter, sunlight & apparently no hair brush

Well if you’re still here, sticking out my first ever blog post to the end, then fair play to you. It’s probably taken the same amount of time to read, as it does to henna your hair. You da real MVP.

Much love x

*I am currently working on a ‘something similar’, and who knows, if I stick this whole blogging business out I may end up posting about it at a later date.